Introduction to lighting for photography & direction of light
Photography From the Greek word which literally means: “Drawing with light”
Light travels in straight lines and without it we cannot see. Most objects do not give off their own light, so what we see is the light that is reflected off the subject into our eyes, and this in turn determines how the object or scene appears to us.
When light is low we don’t see things so clearly. When there is zero light we see absolutely nothing, even if objects are right there in front of our eyes. So, in the same way that our eyes need light to see, the camera needs light to capture a picture.
Lighting for photography is everything when it comes to getting the right photo, and it not only determines what we see, but also how we see it. All of us are aware that the world around us appears differently depending on the day, the weather, and time of day or year. So, just as the light determines how we see things, it also dictates, to some degree, how our photo will look. Therefore, not only do we have to consider how much light is available, but also:
- The quality of the light
- The colour of the light
- The direction of the light
- The source of the light
- How the light is falling upon our subject and what effect it has
Light can come from a variety of sources:
- Natural light from the sun (best)
- Artificial light (bulbs etc)
- Camera flash
- Candles
There are various types of light
- Direct light (hard light from a small source) (sun, flash, street lights, candles) This produces high contrast images with lots of shadows and definition, along with bright, vivid colours
- Diffused light (soft light from a large source) (cloudy day, big windows, large studio softboxes) This gives soft, low contrast images with little or no shadow, along with softer more subtle colours
- Indirect light (Reflected light) (water, bounced flash, large surfaces). Softens and diffuses light. Can also help to fill in unwanted shadows.
Direct light effects

Direct light comes from one direction and therefore produces bright and dark sides to the subject it illuminates. The result, as you can see by the illustration to the left, is a high contrast scene with hard light, hard shadows and hard edges with lots of definition.
Direct and reflected light
I took the picture of the snowboarder on a bright, clear sunny day, so here direct light from the sun was illuminating the subject. Notice how bright the colours are, and how much detail, definition and sharpness there is on the subject. As the subject was in the air with nothing but the sky behind, so shadows were avoided.

This was also taken in winter, when the air was clear and free of moisture. So take note of light quality. It’s not enough that it’s sunny. While the sun may be out, there could still be a lot of haze and moisture in the air, which affects the clarity of a scene.
This is especially true in the summer months when it’s hot. Time of year and the time of day are also important. When the sun is higher in the sky, around midday or during the summer months, then the light is harsh and hazy. Because I took this on a mountaintop ski resort in winter, the air was crystal clear which has also resulted in a crystal clear image. During winter the sun is lower in the sky so the light is less harsh. And finally, snow is reflective, so the underside of the boarder and snowboard is also lit. So not only does this image have direct light, but also reflected light.
Unwanted shadow

However, when photographing people in direct light, shadows can be a major problem. So you must look carefully when photographing under these conditions. As you can see on the photo to the right, the woman has cast a shadow over the child. You could also use a fill in flash to help reduce these shadows, but it’s best to avoid direct light altogether.

On the other photo here you can see that the flash has also cast a shadow behind the child and the Winnie the pooh bear. The shadow has also been enhanced by the bright white background. So take care when using flash. Try to position your subject away from walls or other background surfaces.
Tip: On camera flash produces fewer shadows when shooting your subject straight on with the camera horizontal. To minimise shadows consider using an on flash diffuser: (See bottom of the page)
Wanted shadow
Not all shadows are unwanted. When used correctly they can enhance, give shape, texture, depth and contrast to an image.
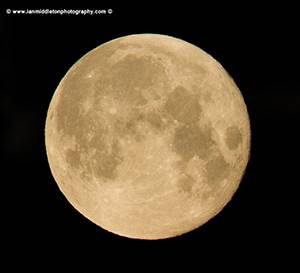
A classic example of this is the moon. Study the following two photos:

When the moon is full, light is shining directly upon it from the front. In this state there is zero shadow, so the moon looks very flat and two dimensional.

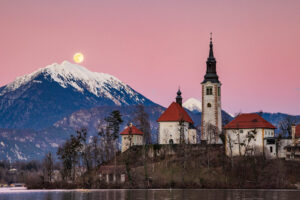
In the image of the waning moon, the light is shining from the side. Notice how we can now see some of the craters near to the shadow area and also the moon looks more three dimensional.
Diffused light effects

Diffused light comes from a large source rather than a single small source. Technically, light is diffused when it passes through a transparent object such as a large white sheet, or a window. The result is that the light scatters and spread and the diffuser become the light source rather than the original light source. Therefore, the larger the diffuser, the softer the light.
The figure on the right shows how the light is repeatedly scattered through increasingly larger surfaces.

The biggest example of this is the sky on an overcast day. Go outside on a sunny day and look at the sky. You’ll be blinded by a single hard beam of light from the sun. But go out on an overcast day and you’ll see that there is no single hard beam of light, but the whole sky is evenly lit. Now look around and you’ll see there is little or no shadow. This is because the light is scattered, as you can see in the diagram to the left, and lighting the land evenly, rather than directly.

As you can see by the photo below, the soft light of an overcast day produces a scene with low contrast and less vibrant colours. Notice the almost complete absence of shadow here.
Diffused light for people

Shot on an lightly overcast day

Taken using light from a large window

Using a tree as shade
Diffused light is often the best light when photographing people portraits. As we learned earlier, hard direct light gives lots of definition and therefore also shows up the flaws and lines in our faces. Diffused light eliminates the problem of shadows, and also gives softer, smoother and more flattering results. Also under these conditions, you don’t have to worry about unwanted shadows. Alternatively, you can also use a fill-in flash to eliminate any shadows.
My book
Learn Photography
For a more comprehensive look at photography, check out my book, available to buy at Amazon.
Shedding light on all the photography basics in one book.
Want to know how to take better photos? Well, first you need to master the basic techniques. Whether you are a complete beginner or an intermediate looking to improve your photography, this book is packed with photography techniques, tips and advice for beginners and intermediates.
All the camera functions and their effects explained.


