Camera filters, to use or not to use!
There are people out there who argue that camera filters are no longer necessary in the age of digital photography. Many filter effects can also be simulated in Photoshop, such as a grad filter, which can be simulated by bracketing your exposures and blending them. Warm up or cooling filter effects can be done by simply adjusting the white balance or applying the filter in PS or Lightroom.
However, there are some which cannot be simulated such as a polariser, and an ND. The fact is there are numerous occasions when a camera filter can and should be used.
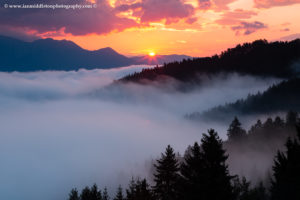
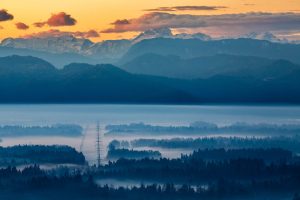
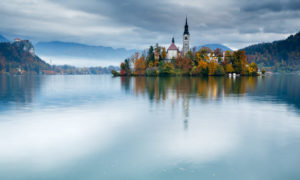
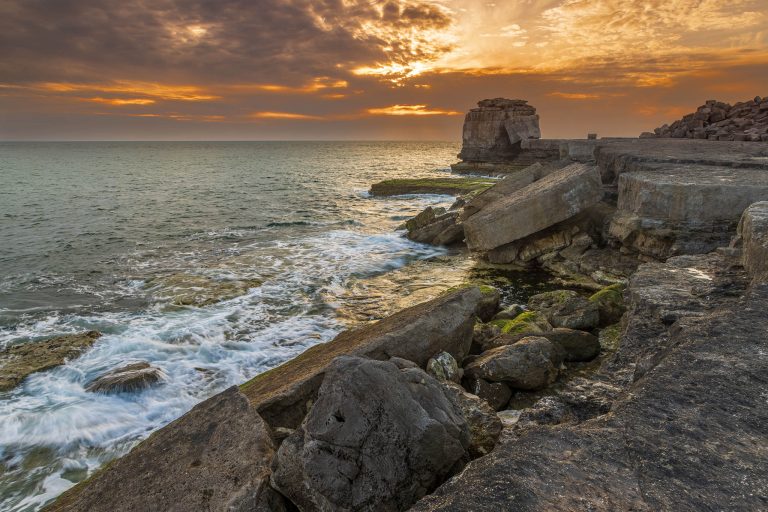
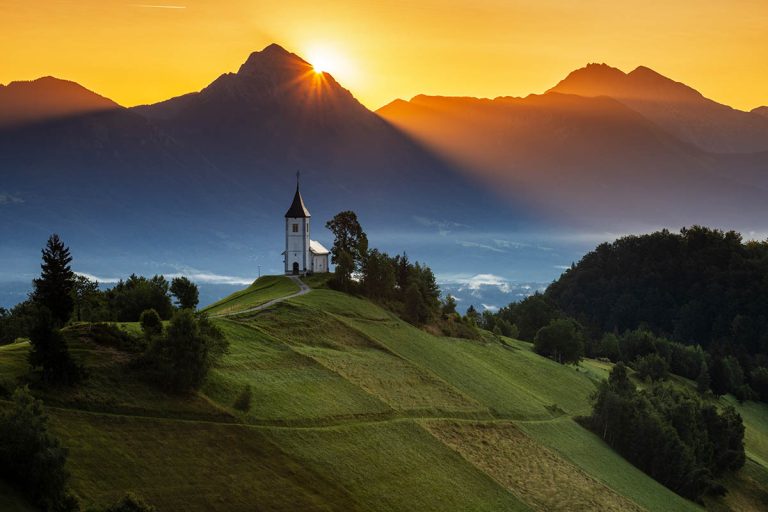
For the two photo above, I used a neutral graduated filter to balance the exposure, as the brightness difference between the sky and foreground was far too much for the camera to handle. Yes, I could have blended exposures, but first of all why do all the extra work when you can do it in camera? Secondly, it’s satisfying to see the result there and then on your viewscreen. Finally, for the seascape, moving sea and clouds are not so easy to blend together, and you risk the chance of ghosting when blending in the darker sky or lighter foreground!
So in this article, I am going to give you a rundown on the various camera filters and how best to use them.
1: Polarising Filter
The polarising filter is probably the most useful of all camera filters and is an essential part of my photography kit, hardly ever absent from my lens. Notably, it is the only filter that cannot be replicated in Photoshop or any other photo editing software.
What does a polarising filter do?
Essentially, a polariser’s main job is to manage the path of polarised light, which is light vibrating in a distinct plane. It achieves this by permitting light waves oscillating in one direction to pass through while hindering or minimizing light waves oscillating in other directions.
On a less technical note, it blocks out those pesky light rays often bouncing off non-metallic surfaces like water, glass, or wet leaves. By blocking the reflected light, it cuts down on glare and tones down those overly bright spots.
Here are some useful effects of using a polarising filter:
Boost colour and contrast:
A polariser can be used to enrich colours and amplify contrast in a scene. By diminishing glare from reflections, it unveils the true colour and detail of a subject, resulting in a photograph that’s both vibrant and captivating. This effect is particularly effective when capturing trees, leaves, and foliage, especially when damp. By minimizing glare, colours appear deeper and more pronounced.
Eliminating reflections on water:
The polariser is commonly used for controlling or eliminating light reflected on the surface of water, in particular on lakes, rivers or the sea. You can use it to darken the surface of the water when it’s too bright, and completely eliminate reflections.
Darkening Skies:
One of the primary applications of a polariser is to intensify the richness of blue skies. This technique accentuates cloud formations, making them pop against the azure backdrop.
Enhancing reflections on water:
Another, less familiar application is enhancing images or colours reflected in water. This might sound contradictory considering I just mentioned its ability to eliminate reflections. However, with a circular polariser, rotating it fully eradicates the reflected image. Yet, if you gradually dial back the polarization intensity, you can reach a sweet spot where glare is reduced enough to render the reflected image more vivid and defined.
How to use a polariser
Two varieties of polarising filters exist: linear and circular. The linear type is straightforward to attach to the lens. The circular polariser, however, is more prevalent. It offers the flexibility to adjust the polarisation strength by rotating it on the lens. The efficacy of the polariser fluctuates based on the angle of the light source in relation to the camera and the orientation of the filter. Hence, these filters yield optimal results when shooting subjects positioned at a 90-degree angle to the sun or other prominent light sources.
Watch the video here for effects of a polariser on skies
2. Neutral Density (ND) Filters
The primary goal of Neutral Density filter is to control the amount of light that enters your camera. They are used to obtain a slower shutter speed or wider aperture in bright light when you wouldn’t otherwise be able to achieve this. They are used to capture smooth waterfalls or create motion blur effects in bright light.
ND filters come in different strengths, allowing you to adjust the exposure according to your needs.
What is an ND filter used for?
So why would you want to make the scene darker? Well, the primary reason is to force a longer exposure or a wider aperture than would otherwise be possible in bright light without overexposing the image.
Creative Long Exposures
Landscape photographers employ long exposures to achieve artistic blur effects, often capturing the movement of clouds or flowing water, such as rivers, rapids, and waterfalls. Furthermore, an exceptionally long exposure can transform water into a smooth surface resembling ice or mist. These techniques are readily applied during moments of natural low light, like dusk or dawn. However, in situations with extremely bright daylight or when shooting against strong sunsets or sunrises, achieving a sufficiently long exposure becomes challenging. This is where the ND filter becomes indispensable.
ND filters are available in various strengths, typically measured in stops. In photography, reducing light by one stop entails halving its intensity, while increasing it by one stop doubles the light. Consequently, when light is reduced by one stop, the exposure time needs to be increased by one stop as well.

For instance, if your initial exposure time is 1/60th of a second and you apply a one-stop ND filter, you must extend the exposure time to 1/30th of a second.
By diminishing the amount of light, you can prolong the shutter speed to achieve a lengthier exposure. Landscape photographers commonly utilize 3-stop, 6-stop, or for extremely long exposures, 10 or 15-stop ND filters. A 10-stop ND filter, for example, can turn a 1/60th-second exposure to a remarkable 16 seconds.
Watch the video here for how to use an ND filter
3. Graduated Neutral Density (GND) Filters
GND filters, are a bit like ND filters, but feature a gradient that transitions from dark to clear. These filters prove invaluable in landscape photography for balancing exposure between the bright sky and the darker foreground. By attenuating the brightness of the sky, GND filters preserve detail in both highlights and shadows, culminating in a harmonious image.
An ND grad filter functions similarly to an ND filter by reducing incoming light. However, with an ND grad, only one half is darkened while the other remains clear. The purpose of an ND grad is to dim one section of your composition, typically the sky, which often appears brighter than the foreground.
This concept ties into dynamic range—the span of brightness within a scene, from its darkest to brightest points, where detail can be captured in both shadows and highlights. Unlike the human eye, camera sensors and film possess a narrower dynamic range. Thus, when capturing scenes with stark contrasts between sky and land, the camera may struggle to retain detail in both areas.
Here’s where an ND grad filter proves invaluable. By positioning the darkened portion over the bright sky, the filter diminishes its brightness, restoring equilibrium to the scene and reducing its dynamic range. Essentially, this evens out brightness disparities, ensuring a more balanced exposure.
Similar to ND filters, ND grads come in various strengths. However, they typically don’t reach extreme levels since the goal is to balance brightness rather than achieve long exposures. A 3-stop ND grad is often sufficient, though in exceptional cases, a 4 or 5 stop filter might be necessary. It’s advantageous to have a range of filters, such as 1, 2, and 3 stops, which can be stacked if needed for greater flexibility.
The graduated part:
In addition to varying in strength, GND filters also offer different types of graduation. The graduation refers to the transition between the clear and darkened sections of the filter, which can be categorized as hard, medium, or soft, depending on your preference.
Hard Grad:
With a hard grad, the transition is sharp and distinct, creating a noticeable separation between light and dark areas. This type is well-suited for scenes with a pronounced change between land and sky, such as a clear horizon over the sea. It’s also effective for landscapes where distant hills or mountains don’t extend too high into the sky. Essentially, hard grads are best suited for scenes with a clearly defined horizon and a distinct separation between land and sky.
Medium Grad:
A medium ND grad features a smoother transition compared to a hard grad but still remains noticeable. The transition is gradual, offering a softer blend between dark and clear sections. It’s suitable for scenes where the horizon isn’t perfectly flat but is still relatively defined, such as close-up mountainous landscapes or city skylines.
Soft Grad:
Soft grads boast the smoothest and most gradual transition of all types. The transition is nearly seamless, resulting in a subtle blending effect that’s hardly noticeable. These filters are ideal when the horizon line is uneven or when objects like tall trees or buildings extend well into the sky within the frame. Soft grads are commonly used in woodland or cityscape photography.
Equipment used in my photoshoots
These are links to photography equipment I use and what’s in my bag and great places to buy them.
Some are affiliate links so if you click and purchase I’ll receive a small commission in return, but at no extra cost to you.